Recently, we have seen numerous users complaining about the no sound issues in Windows 10, and 11 PCs. Are you also one of them? If yes, don’t panic, luckily there are multiple tactics available to resolve the audio or sound-related issues. After reading this write-up, you will exactly know how to make your computer speakers work again. But, before you start, just make sure your headset, external speakers, or else are properly connected and working fine.
How to Fix Speakers Not Working on Windows 10, 11 PC
Here are some workable solutions for you to try in order to fix the computer speakers not working issue. The suggestions have helped several Windows 11 or 10 users who were facing problems with audio on their respective computer systems. Now, without further ado, let’s read them!
Solution 1: Enabling Enhance Audio
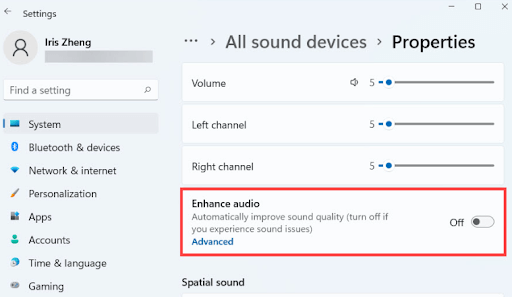
Speakers not working on a computer? Don’t worry, try this simple trick. Because it has proved helpful for many Windows PC users who were dealing with no sound issues. This might help you. Here is how to do that: Step 1: First of all, go to the Windows Settings. Step 2: Click on System and then choose Sound. Step 3: Next, click on All sound devices and select your device. Step 4: After that, scroll down to locate Enhance Audio feature. Turn on this feature. Thereafter, check to see if PC speakers work fine. If this fix doesn’t work for you, then proceed with the other solutions. Also Read: Download & Update Nvidia High Definition Audio Driver For Windows
Solution 2: Check for Latest Windows Updates
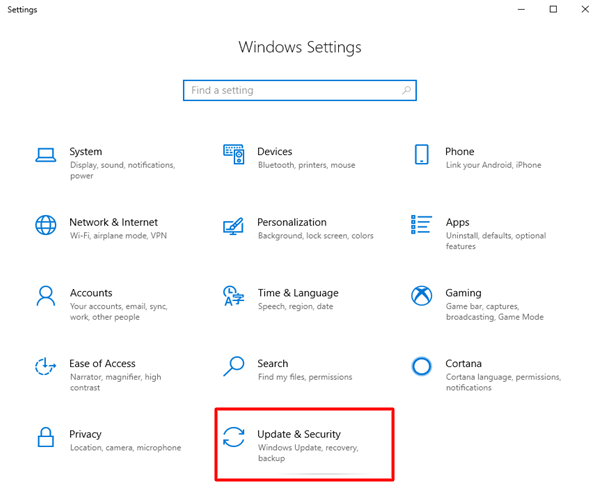
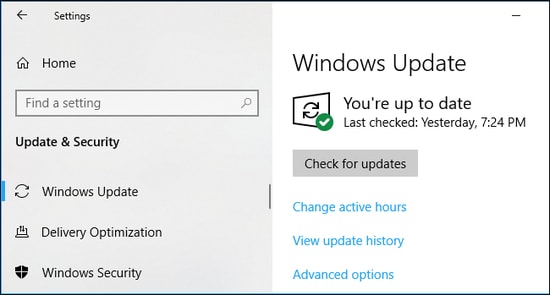
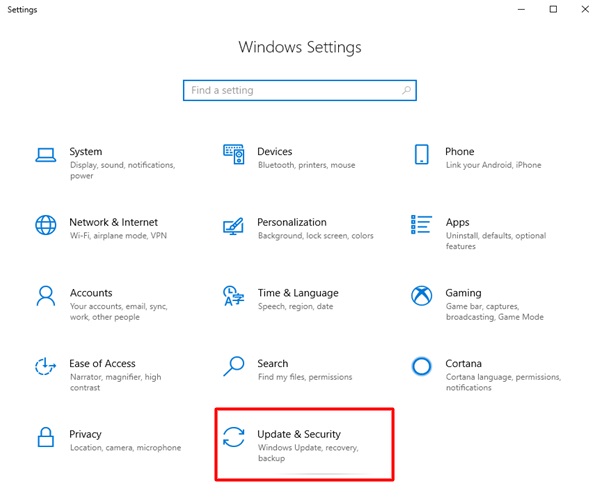
Windows 11, 10 keep releasing the latest updates to resolve numerous issues, so check for the new system updates and it might help you fix the speakers not working issue. Follow the simple steps shared below: Step 1: On your keyboard, altogether press Windows + I keys to invoke Settings. Step 2: Click on the Update & Security option and then be sure Windows Update is selected from the left menu pane. Step 3: Next, click on the Check For Updates. Now, wait and let Windows check for the latest available updates for your system. If any updates are available, Windows 10/11 will automatically download and install them. Once everything is done, reboot your PC to validate the recent changes. After that, check to see if the speakers not working Windows 10, 11 is solved. If not, you can move on to the next solution. Also Read: Realtek HD Audio Manager Download for Windows
Solution 3: Updating your Audio Driver
If you are using an outdated version of the audio driver, then your speaker may stop working fine as expected. Outdated, missing, or corrupted audio driver file leads to very serious problems, which eventually prevents your speakers from detecting any sound. Therefore, to fix the issue, just ensure that you are using the latest and most compatible audio drivers. The users can update their audio drivers manually by visiting the official website of the manufacturer and downloading the right driver according to the Windows OS version they have. Or, users can update audio drivers automatically with Bit Driver Updater. Bit Driver Updater automatically recognizes your PC and searches for the correct drivers for your device. Apart from that, the software also speeds up the overall performance of your PC by cleaning system junk across the corners. In addition to this, the driver updater program comes with an in-built scan scheduler and auto-backup & restore wizard to make the same task much easier. Here are the steps that need to be followed in order to update the audio driver using Bit Driver Updater: Step 1: Download Bit Driver Updater for Free from the button below. Step 2: Run the downloaded file and follow the on-screen instructions to finish the installation process. Step 3: Launch Bit Driver Updater on your computer and click on Scan. Step 4: Wait for the scanning to be completed. Once done, check the scan results and click on the Update Now button shown next to the outdated or problematic audio driver. Or, you can also click on the Update All button, this way you update all outdated PC drivers in one click. However, as you click on the Update All button, you will be prompted to upgrade to the pro version. Because the free version is partly manual and only allows to update drivers one by one. Moreover, with the pro version, you will also get a 60-days complete money-back guarantee and round-the-clock technical support. Also Read: How to Find and Fix Audio Playback Sound Problems in Windows 10
Solution 4: Run Audio Troubleshooter
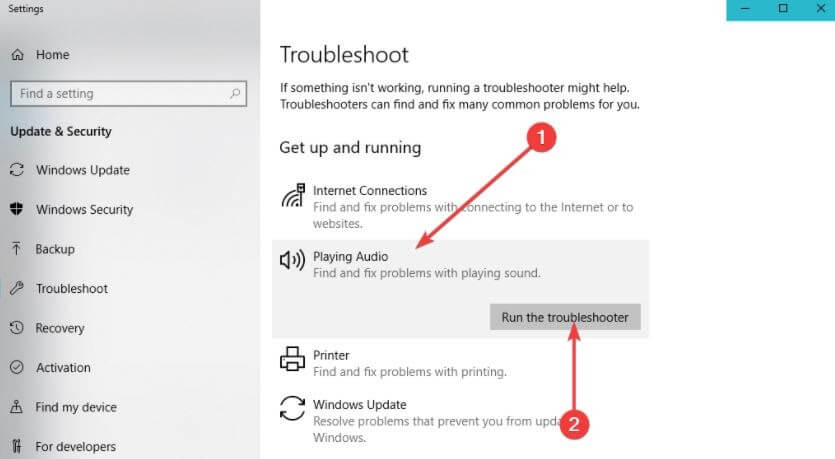
In order to fix speakers not working in Windows 11 or older versions, users can also use Windows in-built troubleshooter. This allows Windows to detect and resolve issues on its own. To use this trick, all you need to do is just follow the steps shared below: Step 1: Launch Windows Settings. Step 2: Click on Update & Security. Step 3: Choose Troubleshooter from the left navigation menu. Step 4: Next, click the Additional troubleshooters, choose Playing audio, and then click on Run the troubleshooter. The above procedure lets Windows find and fix the detected issues. After this, you can check whether your PC sound is working properly or not. Also Read: How to Download Dolby Audio Driver for Windows
Solution 5: Restart Windows Audio Services
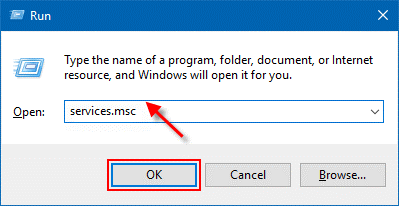
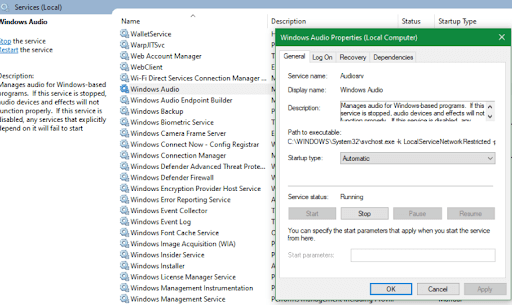
After trying all the solutions, if you still face no sound issues on your Windows PC, then this could be a BTS (Behind-The-Scenes) problem with Windows Audio Services. Sometimes, these services automatically get disabled for no reason, and if this occurs, you will have no sound on your Windows PC. Hence, it would be better to check if the Windows audio services are running. If not, you can start it again, and if in case it is in running mode, and still you are experiencing sound-related issues, then restarting the Windows audio services is recommended. To do so, you can follow the steps below: Step 1: Hit the Windows and R keys together from your keyboard and type services.msc, then press Enter key to proceed. Step 2: This will open the Windows Services, here you’ll need to scroll down until you see Windows Audio and Windows Audio Endpoint Builder. Step 3: Right-click on each and select Restart. Step 4: Wait for the process to finish. Note: Please be sure to check the service’s Startup type. That means the Windows audio services should be set to Automatic by default. Also Read: Download and Update Gigabyte Realtek Audio Driver on Windows PC
Speakers not Working on Windows 10, 11: FIXED
In this write-up, we have covered six fixes for Windows 11 and Windows 10 audio problems. We hope now you can hear sound on your PC once again. If you think we missed out on anything about the Speakers not working issue, then please feel free to tell us in the comments box below. Apart from this, do subscribe to our Newsletter for more troubleshooting tips to fix PC errors and problems in no time. Meanwhile, follow us on our Social Media Pages: Facebook, Twitter, Instagram, and Pinterest.
